

Hello everybody!!!
Sorry I havn't been on in awhile :/
Kind of busy with this 8 week quarter........ that is 3 weeks less that usual :'(
So I have been dropped in a hole with 3 different projects :/
I actually just got back from feed my starving children :) and for those of you that don't know what it is ............. you basicly just fill bags with flavor powder, dried veggies, soy beans, and white rice. Our group filled 17 boxes in 1 hour and 30 mins. And there is nothing better that a healthy competition right? We had so much fun trying to beat the "popular" guys :D But in the end we both finished with 17 boxes X( O well :/
I am having a dry spout in my creativity :/ I NEED IDEAS!!!!!!!! ugh!!!!! Nobody ever leaves comments. Just take a good random idea that is in your head and I will make it and make a tutorial!!!!!
Didn't make my 100 views but O well :'(
Comming Soon:
-Artist Trading card~trading
-Eventually some things for sale :P
GTG and get ready for my big sis to come so we can go to Vallue Village.
If any of you have any friends that love clay or Artist Trading Cards......... message me at my deviant art account:
Username: aljohnsonwoofwoof
Subcribe Over Here!!!!!
Saturday, February 25, 2012
Saturday, February 18, 2012
Decorate your keys Tutorial
Tutorial:

Materials:
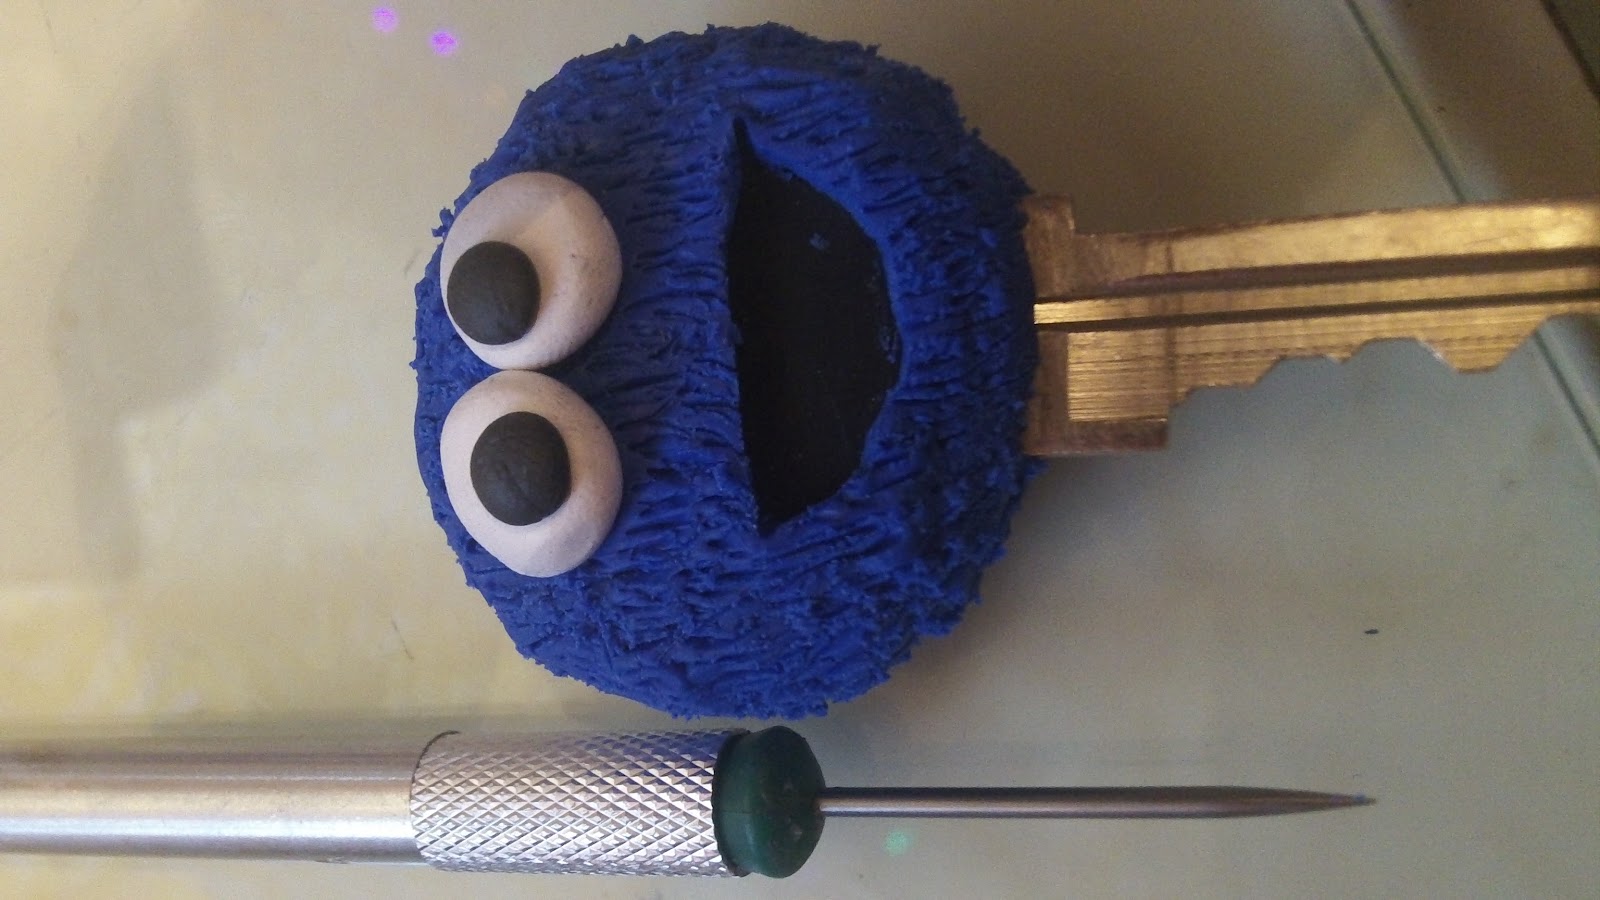
It is my old house key
Seeing as my old house has been torn down I thought I would use it as a prototype
I think you all know who it is................................... COOKIE!!!!!!!!
1) Find key and put on base color and make shure to make the hole where the key ring is

2) Bake at 275 for 10-15 min.
3) Cover with next level of clay make shure to continue carving the key hole

4) Cut out mouth. I acctualy covered the hole up because I couldn't fit the eyes on right

5) Make and place eyes

6) If you want to have that finished look, use your pockey tool and scratch the blue clay to make it look like fur. BEWARE this process takes like 10 min to cover the hole blue area.............. be patient
7) Bake at 275 for 10-15 min.
8) Glaze
This is just a video of it. Like 2 seconds, but my camera has high def video soooooooo you should understand by now

Materials:
- Key
- Clay
- Pockey tool
It is my old house key
Seeing as my old house has been torn down I thought I would use it as a prototype
I think you all know who it is................................... COOKIE!!!!!!!!
1) Find key and put on base color and make shure to make the hole where the key ring is

3) Cover with next level of clay make shure to continue carving the key hole

4) Cut out mouth. I acctualy covered the hole up because I couldn't fit the eyes on right

5) Make and place eyes

6) If you want to have that finished look, use your pockey tool and scratch the blue clay to make it look like fur. BEWARE this process takes like 10 min to cover the hole blue area.............. be patient
This is my pockey tool >
7) Bake at 275 for 10-15 min.
8) Glaze
THEN YOUR DONE!!!!!!!!
Saturday, February 11, 2012
Abstarct Earring Tutorial
TUTORIAL
WARNING:
Make shure you :
DO:
- make shure oven is on
- right temp
- Clean oven (this is for people using their normal oven, chemicles!!!!!!)
- Use tools for anything other that crafting and clay
- Use toaster oven for food if you are not going to clean it (chemicles!!!!!)
- Eat while playing with clay
- Use reusable clay or clay that says "never dries out"
- IMAGINATION
- At least 2 different colors of baking clay
- Pasta machine or roller
- Cookie cutter or you can use a craft knife
- baking oven
- Gloss
- Pins w/ loops
- Earring backs

Molding:
 1). Pick base color. I am using white but if you are going to do steampunk I suggest translucent of a shimmery or pearlecent color
2). Roll amount wanted in a pasta machine. Put pasta machine on thickest size (mine is 7)


3). Pick a shape. I used my teardrop clay cutter that I got at Micheals. Cut several shapes, I suggest 3 for each earring.


4). Smooth all together, without loosing shape!!!!!
5). Use different colors and add decorations


6). After finishing all desired decorations, add holes, and bake!


Baking:
7). Place in toaster oven. Set toaster oven at 275 degrees.
Bake for 10-15 min. Take out. Let sit!
Wires & Glazing:
8).Wrap wires in holes


9). Choose what kind of earring you want it to be and put it on them

 10). Glaze in whatever stuff you have, I suggest stuff that you don't have to bake on
11). Hang on anything with a desposable surface close below and wait for 1 hour

11). Wear and enjoy!!!!
Have any tutorials you want me too make?....................... Comment!!!!!
PIC DAY 2
For the past few days I have been waiting for a couple more page views..................... but I only got like 3. So I have decided to make a new post. I have been trying a new clay charm style............ steampunk :/


These (below) are bug charms I made out of clay :)


This pic I took in RTI................. this 1/4 we are doing forensic sience
these are my friends :P

Zoe > Sonya > Genevieve > Joe > Claudia

It was my mom's birthday yesterday <3 (2-10-11) She says she is "25" yea right :P
This next pic is a animal my brother calls "Kit-Koala" the head I drew with my eyes closed :O
then I drew everthing else in

I <3 Drawing cartoon dragons
Here are some:


Well there it is. Eventually I will make tutorials for the clay stuff! That will be
my objective for today <3
Subscribe to:
Posts (Atom)